November 6, 2011
Duck Breast 101
The topic du jour is duck breast. Duck breast is a staple of our household from the fall to late spring. There is something about the suite of duck, turnips, roast pumpkin, butternut squash soups, apples, bacon, cinnamon, curry, ... that just signals "fall" to me.
Let me begin with the basic steps:
1. Let the duck breast sit in the fridge (outside of any packaging) for days;
2. Sous vide the duck breast at 130°F (54°C) to 134°F (56.7°C) for hours (at least three);
3. Remove the duck from the water bath and vacuum seal;
4. Score the fat;
5. Place it fat side down in a frying pan (non-stick not necessary) and sautee until brown;
6. Flip over to given the non-fat parts heat for 3-4 seconds;
7. Remove from the frying pan and let rest fat side up for 10 minutes;
8. Heat up the duck fat in the frying pan and spoon some over the fat side of the duck breast;
9. Salt and pepper the fat side of the breast;
10. Let sit 1 minute on a cutting board;
11. Slice;
12. Transfer to a cooling rack over a flat pan for 2 minutes; hold reserve duck on rack;
12, part deux. A little holy smoke, perhaps?;
13. Plate with the remaining components and reserve the rest.
OK, let's start with (the implicit) step 0: choosing a duck breast. There are basically three common types available to consumers in the US. First, the most likely duck at your grocer is Pekin, also known as Long Island. This is a very fatty duck; I prefer it for confit or roast whole duck. A second, and good, choice is the Muscovy duck, with a big breast (particularly males), less fat and a rich meat in the breast. Finally, there is the Moullard (a cross between Muscovy and the wild Mallard) duck, your classic foie gras duck. The breast of these is referred to as Magret. I usually use the Magret and, in particular, tend to favor the D'Artganan brand.
The point of step 1. is based on my own gross casual empiricism: I have noticed that letting the duck sit for a few days (at least three and up to five) in the fridge helps concentrate its "duckiness", yielding a deeper, richer and ever so slightly more gamey (which I look for) flavor in the end product. To me it almost moves the duck a bit toward the taste experience of wild mallard taken down with your family's old side-by-side. It is very important that you leave the duck outside of whatever packaging encased it originally.
The best way to do this is to have it skin side up on a cooling rack above a flat pan (see the rack and pan setup below: I find this kit generally to be so useful for handling proteins). If you leave it on a plate make sure that it does not sit in a pool of duck blood. Do not worry if it seems kind of stiff or dry after a couple of days. You could say that this is akin to a kind of dry aging.

(The duck, skin side down, after a few days of dry aging in the fridge. Note the rich, deep red of the meat. Note the grid marks on the meat: it was laid skin side up, as it should be.)
The sous vide stage is pretty explanatory. I like a fairly medium rare duck breast. Hence the temperature setting of 130° F (54.4° C) to 134°F (56.7°C) . I would not go above around 136° F (57.8° C) or below 128.5° F (53.6° C) . I find that it is better to go longer than shorter in the water bath: the resulting breast tends to be more tender.
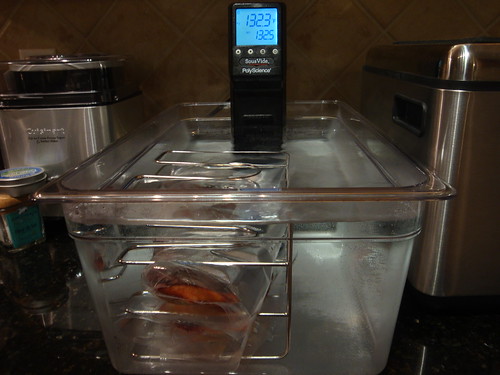
(The birds in the bath. I went with 132.5° F (55.8° C) this time. It was en sous vide for roughly 4 hours.)
I score the fat (step 4.) for several reasons. It provides the "classic" look. I find that the scored fat also browns better and provides a more texturally appropriate surface for holding on to seasoning.

(The scored breasts after coming out of the water bath, alongside the Shun Nakiri I usually apply to this task, chiefly because knives of this design help you a bit with avoiding the cardinal sin of scoring: never cut down to the meat. )
For step 5. I tend to cook the fat down a fair amount. But I don't like really fatty duck breast. I saute over medium high heat, and I tend to lubricate the pan first with a bit of a neutral oil that can handle heat, such as grapeseed oil (a few times when I did not do this there was some slight char on the duck breast). I tend to drizzle a bit of the oil into the empty pan and then smear it around with a paper towel. Initially, I always heat the pan to medium: even with the neutral oil I find that setting it in too hot a pan initially can create some burn. I then raise to medium high over the next minute or so after the breast is put in the pan.
One thing I do not do much is use the torch. I find that it adds burnt bits with duck.

(Post searing (but pre-seasoning) of the fat side, with two different takes on doneness. This is mostly about personal preference. The breast on the left is crispier, but at the cost of a bit less juice than the right hand side breast. The tradeoff can be diminished somewhat by coming to high heat quickly.)
Step 8. is basically about creating a moist, glistening surface which will hold on to the salt and pepper, and Step 10. is intended to allow the spooned duck fat to cool a little, so that the salt and pepper will "grip" the duck.
In Step 9 I call for salt and peppper, but more generally just add whatever dry material (powder, flake, grain (as in, of salt), etc.) is called for to finish the crust. So, for example, you could dust on five spice powder for a more Asian taste. The point is that you spoon heated fat on the skin, giving a glistening surface to which the dry finisher will adhere.
For Step 11. it is really important to use a very sharp knife. Otherwise you would not get clean, gorgeous slices.
Step 12. is all about making sure that the sliced duck does not wallow in its own blood (which will be leaching out). Transfer gently from the cutting board to the cooling rack, carrying the duck from underneath (do not mess up the beautiful vista of the top of the duck).
Step 12, part deux is just a little final, interesting touch: hitting the duck with a bit of smoke, to introduce another interesting level of flavor and a kind of re-assuring rusticity. However, since doneness is about perfect at this point, it must be cold smoke. To pull this off, I would recommend either whatever ghetto cold smoking contraption you have rigged up or some commercial gadget like the Polyscience Smoking Gun.

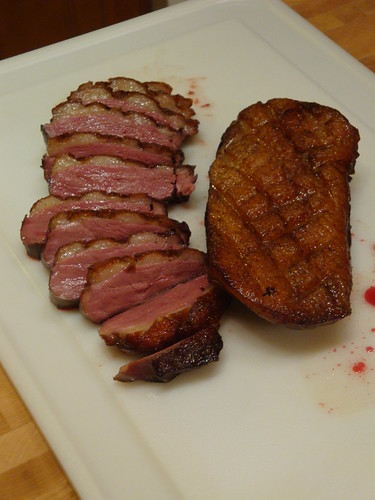
(The gorgeous final doneness. Note the perfect, consistent medium rare throughout. Notice as well the unpardonable slight tearing of the carmelization on the fat: this is what happens when you don't check the sharpness on your knife! Your knife for slicing the breast should be as sharp as hell!!!)

(Beautiful pink!)
A few final points:
1. I like to let the diner sauce their own breasts. I thus tend to have the sauce in a serving vessel on the side.
2. The sauce should be warm, not hot. For this one I threw pitted dark cherries, some sugar (for some maceration action above all), some water, some chicken stock and some thyme on the sprig into a sauce pan, brought it to heat, removed the thyme sprig, sent the result through a food mill, returned to the pan, threw in some more pitted dark cherries, reduced, reduced, reduced, threw in a bit of butter, and then removed from the heat and let cool in a serving bowl. There are literally a trillion variations on this basic sauce.
3. Do not lay the duck breast down on some sort of steaming component (like a risotto just out of the pan). If you spoon a sauce over it, make sure it is not molten hot. This sort of thing will overcook the duck!!
4. I generally like to cook the breasts unadorned, and then add finishing touches (salt and pepper; an Asian five spice thing; whatever) at the end. There are a few exceptions (e.g. duck a l'orange) that prove the rule: most of the finishing touches penetrate (and hence add) little while cooking in the water bath en sous vide. And the finishing touches frequently complicate carmelization of the skin. And anyway most of the time the whole point of duck breast for me is some kind of outer crust paired with unblemished internal duckulence (who needs penetration of flavor?).
5. God designed this kind of duck dish for Pinot Noir. Or was it the other way around?
Posted by dag at 9:29 PM | Comments (0)
July 17, 2011
Pork Chops: Initial Thoughts
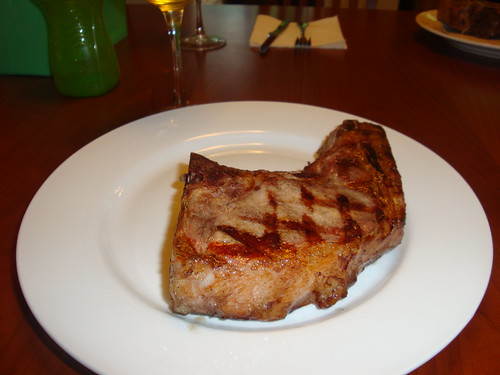
(Pictured Above: A Basic Thick-cut Pork Chop With No Accompaniement)
Today the subject is pork chops, and like so many other steaks, chops, etc. type proteins, my basic approach is as follows:
1. Cook it in a water bath en sous vide to achieve a perfect internal temperature;
2. Remove from the water and vacuum pouch and let it sit for 10-15 minutes (I have found that immediately finishing it off per the methods below sometimes leads to overcooking in the middle);
3. Finish, preferably over a grill with hardwod charcoal and flavoring woods (like apple, hickory, mesquite, etc.) but certainly over some kind of high heat.
Ah, you might ask, but what heat for the water bath? Well, as always, there are two considerations: safety and taste.
First, let's consider safety. Along with all of the other nasties associated with proteins, pork is particularly prone toward parasites that you do not want to eat alive. Chief among these is Trichinella spiralis (i.e. trichinosis). Trichinosis is said not to be that common in today's pork, but even if this is true it is not a guarantee and is just about probabilities. Why needlessly take a chance with it?
You will read on the internet about various temperatures required to kill trichinosis (e.g. 138°F (58.9° C) is frequently suggested). My understanding, however, is that it is a question of temperature and time.
Wikipedia mentions (or at least at one point mentioned) USDA Title 9 section 318.10 Table, which provides the following temperature/time combos for beatin' this little worm:
| °F | °C | Minimum Time |
|---|---|---|
| 120 | 49 | 21 hours |
| 122 | 50.0 | 9.5 hours |
| 124 | 51.1 | 4.5hours |
| 126 | 52.2 | 2 hours |
| 128 | 53.4 | 1 hours |
| 130 | 54.5 | 30 minutes |
| 132 | 55.6 | 15 minutes |
| 134 | 56.7 | 6 minutes |
| 136 | 57.8 | 3 minutes |
| 138 | 58.9 | 2 minutes |
| 140 | 60.0 | 1 minute |
| 142 | 61.1 | 1 minute |
| 144 | 62.2 | Instant |
The second consideration is taste, and in this case I think the main concern is achieving maximum juiciness. Visually, I am looking for a faint, haunting pink to the meat; if it is white I find that it is overdone. You could shoot for a more rosy pink (in which case you would set your water bath below the temperature I use) but in my experience this involves a potential cost (many of your friends/guests/family might be off-put by really pink pork since there is a deep, instinctive human fear of under-done pork) for little gain (it really is not much juicier unless it is basically rare).
This calls for a relatively, but not ridiculously, low heat for the water bath.
Now, all this being said, I am not going to tell you what is safe, only what I do myself (so, no guarantees of safety implied):
I tend to cook my pork chops en sous vide in a water bath heated to 133-134°F (56.1-56.7° C) (specifically, 133.5° F (56.4° C) is where I typically set my circulator). And I cook it thus for at least 3-4 hours (because my chops are always thick cut; if they were thin cut I might go only 2 hours, though I have never tried this).
The result of my process is pictured above. This chop is unadorned by anything and was finished with a grill over simple Whole Foods real wood chunk charcoal (with no added wood for a particular flavor) for about 90-120 seconds per side. I could have finished it more or less intensely on the grill (that is a matter of personal preference; I usually do look for a bit more carmelization). If you do want to experiment with different levels of grill finishing just do so by altering the heat. So, for instance, if you want more char and grill hash, do so by building a hotter fire, and not by lengthening grill time: whatever degree of finish you prefer, you do not want this to spend a long time on the grill since it will start to undue that magic of sous vide by cooking it internally.
Below, you see the same chop with a piece cut out. Notice the perfect internal faint pinkness of this chop. It was very juicy. It could have been made even more so by brining, which was not done in this case but is generally recommended.
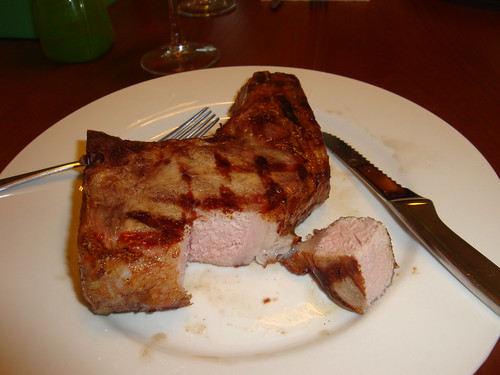
Here is a close-up that captures the faint pinkness:

If you want it just a shade more or less pink, adjust the temperature of the water bath, respectively, down to 132.5° F (55.83° C) or up to 134.5° F (56.9° C). (Note: Use a Polyscience emersion circulator for this kind of edgework: it is a little too tight in terms of temperature tolerance for the Sous Vide Supreme (SVS). The SVS is better for less lean cuts of meat, like ribeye steak, that are slightly more forgiving of 1° F fluctuations.)
Posted by dag at 2:02 PM | Comments (0)
March 17, 2011
Beannachtaí na Féile Pádraig

McAdams Farm bone-in leg of lamb and Whole Food's (made in store by the Chapel Hill meat counter guys) corned beef. En sous vide 48 or so hours at 130° F (54.4° C).
This is the way my ancestor's would have done it ... right?
Update: I actually sous vide cooked the corned beef at two different temperatures: 130.5° F (54.7° C) and 138° F (58.9° C). The riff I had heard was that the lower temps would give a juicier corned beef but the higher one would get you closer to a classic corned beef texture. I have to say that, were I to do it again, I would go for the lower temprature: I felt the texture was just right at either temperature, but that the lower temperature definitely yielded the juicier result. So why was the texture good at 130.5° F (54.7° C)? Probably because of the length of time I cooked it en sous vide: 48 hours.
That said, I made a major mistake: there were pockets of extreme, over the top flavor on the beef. The reason was flecks of things like peppercorns and bay leaves on the surface of the corned beef. Sous vide tends to intensify herb and spice flavors and can essentially scorch with flavor any surface a piece of the herb or spice was touching. You often need to put herbs and spices in some kind of sachet and avoid direct contact with the meat surface in order to avoid these spice and herb "hot spots". So, in future, I need to pick off these flecks, particularly the bay leaves, before putting the meat under vacuum seal.
Posted by dag at 9:13 PM | Comments (2)