April 8, 2012
Tandoori Chicken Wings
So, it has been a while. And what have I been doing with this while? Well, last fall, after many moons of faithful service, my old grill died. I decided to get serious about the new one. Specifically, I had one made by Klose. I dub it "The Beast":
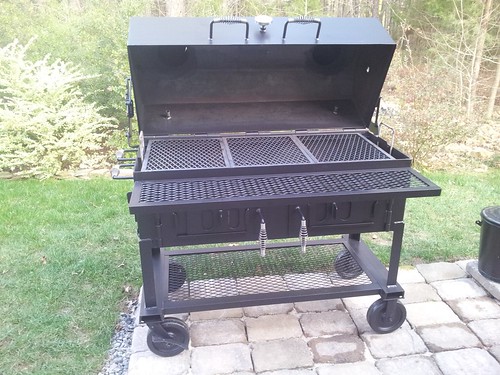
Anyway, it took me a while to get the back ready to receive The Beast, but I have now been happily grilling for around a month (well, less than cooperative weather permitting). I am still at the stage of getting the feel for the beast, but yesterday I landed a dish which is the subject of this post.
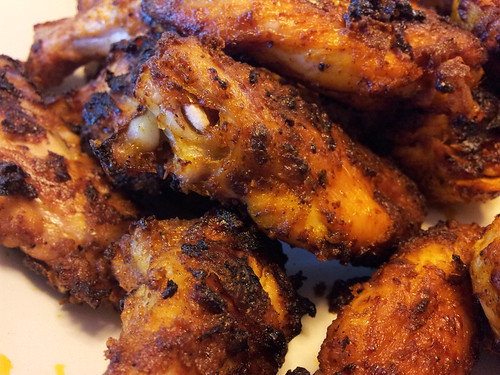
The dish for today is Tandoori chicken wings. Yesterday's try was the second iteration, and my description of the dish will include lessons learned from the first effort.
To begin with, you have to make Tandoori sauce. To do this, rough chop a medium onion, two inches of ginger, and 4 garlic cloves. Toss in a food processor with:
-the zest of 1 lemon;
-1 cup of plain (no need for Greek) yogurt;
-1/2 cup of vegetable oil (and don't be afraid to splash a little);
-1 Tablespoon of ground coriander;
-1 teaspoon of ground cumin;
-1 teaspoon of turmeric;
-1 teaspoon of gram masala;
-1/2 teaspoon nutmeg;
-1/2 teaspoon cinnamon;
-1/4 teaspoon of fresh, and finely, cracked black pepper.
Blend all of these ingredients together in a food processor to make the smoothest Tandoori sauce possible (maybe 3-5 minutes in low pulse). Two notes about this:
1. The resulting Tandoori grill will yield pretty yellow meat. The usual solution for this at Indian restaurants in the US is red food coloring. I tend to increase the dosage of all the spices by 10-20% (e.g. heaping teaspoons/Tablespoon) and add in around a Tablespoon of ground annatto seed to generate some red tinge.
2. This is twice the oil called for in the original recipe that I started working off of. On the first try I felt that the char on the Tandoori was excessive, in large part because the sauce was too thick. I decided to loosen it up a bit and add a phase (described below) where excess sauce would be drained before grilling.
Anyway, take this sauce and pour into a baking pan or some other shallow-ish pan that can be used for marinating. Add to that 3-3.5 pounds of chicken wings (30-35 wings) and stir around to coat with the sauce. (The wings should be 75-85 percent submerged in the sauce, with a sauce layer over the top.)
Cover the pan with Saran wrap and place in the fridge to marinate for 6-12, and up to 24, hours. The longer it goes the more deeply the color will take to the chicken. If need be, stir the wings around every so often to insure more even marinating.
20 minutes before you are ready to put meat to heat, remove the wings from the pan to a bakers cooling sheet (pictured in the next photo) to drain excess Tandoori sauce. After 10 minutes of so flip the wings to insure even drainage.This drainage is key to preventing char (the excess sauce providing in some sense the fuel for char). It won't seem like much drains off, but what does drain is just enough to make the difference. Discard remaining Tandoori sauce.

Meanwhile, I was firing up The Beast. The first time I tried this recipe I did indirect high (>500° F (260° C)) heat. This was too much and, along with extra coating of thick sauce on the wings, generated a lot of char.
The second, successful time, I did indirect medium heat. I fired two charcoal firestarter chimneys and poured one on each on either side of the grill. I then closed the lid to build a bit of heat, toward around 350° F (176.7° C) to 400° F (204.4° C), with a sweet spot of 375° F (190.5° C).
Once draining is complete, put meat to heat. The first step, as always, is to lubricate the grill surface. Use an oil that does well under the high heat, such as grapeseed or peanut oil. Use tongs and some kind of cloth or paper (coffee filters being a favorite of mine) to spread some oil on the clean grill grates.
As you can see from the photo below, I put the wings between two medium fires to insure even heating.
The wings on the upper deck were experimental (great success)! This means that, in principal, I could grill 7 pounds of wings at once on The Beast! That said, if I were doing two different types, the type not presauced would be on the top deck.

As indicated, the target temperature range was 350° F (176.7° C) to 400° F (204.4° C), with a sweet spot of 375° F (190.5° C). I achieved this, once the two chimneys of coals were in, mostly by vent manipulation. To maintain these temperatures, I periodically placed individual pieces of hardwood charcoal on the two fires using tongs.

I would flip the wings fairly frequently (first, around 10-12 minutes in and then at 8-10 minute intervals). To do so, first gently loosen the wing from the grill with the spatula. This is particularly important on the first flip.
I can't remember the total cooking time, but let's call it 35-40 minutes. One more shot of food porn:

The wings actually had a slight red tint not captured under this yellow light.
We served the wings with raita. Simple recipe: mix Greek yogurt with warm water until the yogurt is quite viscous. The toss in a peeled, cored and finedly chopped cucumber. You can add in a cored, seeded tomato finely chopped and/or the same for red bell pepper, as well. Toss in some cilantro and mint to taste, and you can also squeeze in some juice from the lemon used earlier.
So, to be clear, for successful Tandoori wings (or probably successful Tandoori anything else):
1. Get rid of excess sauce;
2. Control the heat.
Posted by dag at 7:01 AM | Comments (1)
July 17, 2011
Pork Chops: Initial Thoughts
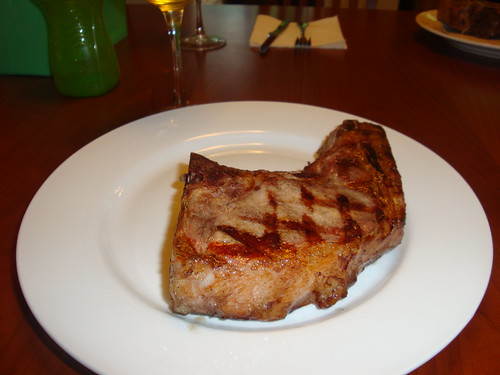
(Pictured Above: A Basic Thick-cut Pork Chop With No Accompaniement)
Today the subject is pork chops, and like so many other steaks, chops, etc. type proteins, my basic approach is as follows:
1. Cook it in a water bath en sous vide to achieve a perfect internal temperature;
2. Remove from the water and vacuum pouch and let it sit for 10-15 minutes (I have found that immediately finishing it off per the methods below sometimes leads to overcooking in the middle);
3. Finish, preferably over a grill with hardwod charcoal and flavoring woods (like apple, hickory, mesquite, etc.) but certainly over some kind of high heat.
Ah, you might ask, but what heat for the water bath? Well, as always, there are two considerations: safety and taste.
First, let's consider safety. Along with all of the other nasties associated with proteins, pork is particularly prone toward parasites that you do not want to eat alive. Chief among these is Trichinella spiralis (i.e. trichinosis). Trichinosis is said not to be that common in today's pork, but even if this is true it is not a guarantee and is just about probabilities. Why needlessly take a chance with it?
You will read on the internet about various temperatures required to kill trichinosis (e.g. 138°F (58.9° C) is frequently suggested). My understanding, however, is that it is a question of temperature and time.
Wikipedia mentions (or at least at one point mentioned) USDA Title 9 section 318.10 Table, which provides the following temperature/time combos for beatin' this little worm:
| °F | °C | Minimum Time |
|---|---|---|
| 120 | 49 | 21 hours |
| 122 | 50.0 | 9.5 hours |
| 124 | 51.1 | 4.5hours |
| 126 | 52.2 | 2 hours |
| 128 | 53.4 | 1 hours |
| 130 | 54.5 | 30 minutes |
| 132 | 55.6 | 15 minutes |
| 134 | 56.7 | 6 minutes |
| 136 | 57.8 | 3 minutes |
| 138 | 58.9 | 2 minutes |
| 140 | 60.0 | 1 minute |
| 142 | 61.1 | 1 minute |
| 144 | 62.2 | Instant |
The second consideration is taste, and in this case I think the main concern is achieving maximum juiciness. Visually, I am looking for a faint, haunting pink to the meat; if it is white I find that it is overdone. You could shoot for a more rosy pink (in which case you would set your water bath below the temperature I use) but in my experience this involves a potential cost (many of your friends/guests/family might be off-put by really pink pork since there is a deep, instinctive human fear of under-done pork) for little gain (it really is not much juicier unless it is basically rare).
This calls for a relatively, but not ridiculously, low heat for the water bath.
Now, all this being said, I am not going to tell you what is safe, only what I do myself (so, no guarantees of safety implied):
I tend to cook my pork chops en sous vide in a water bath heated to 133-134°F (56.1-56.7° C) (specifically, 133.5° F (56.4° C) is where I typically set my circulator). And I cook it thus for at least 3-4 hours (because my chops are always thick cut; if they were thin cut I might go only 2 hours, though I have never tried this).
The result of my process is pictured above. This chop is unadorned by anything and was finished with a grill over simple Whole Foods real wood chunk charcoal (with no added wood for a particular flavor) for about 90-120 seconds per side. I could have finished it more or less intensely on the grill (that is a matter of personal preference; I usually do look for a bit more carmelization). If you do want to experiment with different levels of grill finishing just do so by altering the heat. So, for instance, if you want more char and grill hash, do so by building a hotter fire, and not by lengthening grill time: whatever degree of finish you prefer, you do not want this to spend a long time on the grill since it will start to undue that magic of sous vide by cooking it internally.
Below, you see the same chop with a piece cut out. Notice the perfect internal faint pinkness of this chop. It was very juicy. It could have been made even more so by brining, which was not done in this case but is generally recommended.
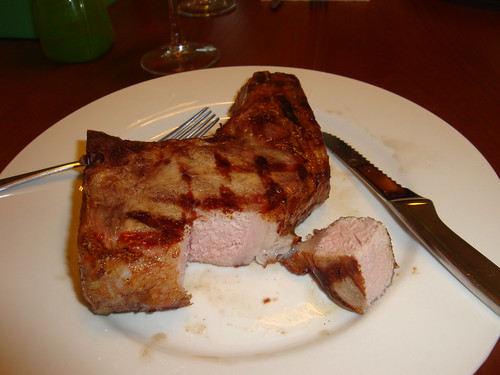
Here is a close-up that captures the faint pinkness:

If you want it just a shade more or less pink, adjust the temperature of the water bath, respectively, down to 132.5° F (55.83° C) or up to 134.5° F (56.9° C). (Note: Use a Polyscience emersion circulator for this kind of edgework: it is a little too tight in terms of temperature tolerance for the Sous Vide Supreme (SVS). The SVS is better for less lean cuts of meat, like ribeye steak, that are slightly more forgiving of 1° F fluctuations.)
Posted by dag at 2:02 PM | Comments (0)