April 8, 2012
Tandoori Chicken Wings
So, it has been a while. And what have I been doing with this while? Well, last fall, after many moons of faithful service, my old grill died. I decided to get serious about the new one. Specifically, I had one made by Klose. I dub it "The Beast":
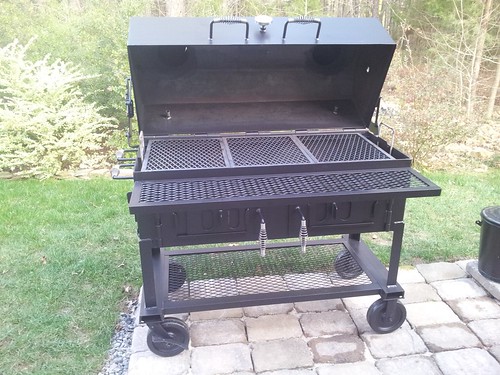
Anyway, it took me a while to get the back ready to receive The Beast, but I have now been happily grilling for around a month (well, less than cooperative weather permitting). I am still at the stage of getting the feel for the beast, but yesterday I landed a dish which is the subject of this post.
The dish for today is Tandoori chicken wings. Yesterday's try was the second iteration, and my description of the dish will include lessons learned from the first effort.
To begin with, you have to make Tandoori sauce. To do this, rough chop a medium onion, two inches of ginger, and 4 garlic cloves. Toss in a food processor with:
-the zest of 1 lemon;
-1 cup of plain (no need for Greek) yogurt;
-1/2 cup of vegetable oil (and don't be afraid to splash a little);
-1 Tablespoon of ground coriander;
-1 teaspoon of ground cumin;
-1 teaspoon of turmeric;
-1 teaspoon of gram masala;
-1/2 teaspoon nutmeg;
-1/2 teaspoon cinnamon;
-1/4 teaspoon of fresh, and finely, cracked black pepper.
Blend all of these ingredients together in a food processor to make the smoothest Tandoori sauce possible (maybe 3-5 minutes in low pulse). Two notes about this:
1. The resulting Tandoori grill will yield pretty yellow meat. The usual solution for this at Indian restaurants in the US is red food coloring. I tend to increase the dosage of all the spices by 10-20% (e.g. heaping teaspoons/Tablespoon) and add in around a Tablespoon of ground annatto seed to generate some red tinge.
2. This is twice the oil called for in the original recipe that I started working off of. On the first try I felt that the char on the Tandoori was excessive, in large part because the sauce was too thick. I decided to loosen it up a bit and add a phase (described below) where excess sauce would be drained before grilling.
Anyway, take this sauce and pour into a baking pan or some other shallow-ish pan that can be used for marinating. Add to that 3-3.5 pounds of chicken wings (30-35 wings) and stir around to coat with the sauce. (The wings should be 75-85 percent submerged in the sauce, with a sauce layer over the top.)
Cover the pan with Saran wrap and place in the fridge to marinate for 6-12, and up to 24, hours. The longer it goes the more deeply the color will take to the chicken. If need be, stir the wings around every so often to insure more even marinating.
20 minutes before you are ready to put meat to heat, remove the wings from the pan to a bakers cooling sheet (pictured in the next photo) to drain excess Tandoori sauce. After 10 minutes of so flip the wings to insure even drainage.This drainage is key to preventing char (the excess sauce providing in some sense the fuel for char). It won't seem like much drains off, but what does drain is just enough to make the difference. Discard remaining Tandoori sauce.

Meanwhile, I was firing up The Beast. The first time I tried this recipe I did indirect high (>500° F (260° C)) heat. This was too much and, along with extra coating of thick sauce on the wings, generated a lot of char.
The second, successful time, I did indirect medium heat. I fired two charcoal firestarter chimneys and poured one on each on either side of the grill. I then closed the lid to build a bit of heat, toward around 350° F (176.7° C) to 400° F (204.4° C), with a sweet spot of 375° F (190.5° C).
Once draining is complete, put meat to heat. The first step, as always, is to lubricate the grill surface. Use an oil that does well under the high heat, such as grapeseed or peanut oil. Use tongs and some kind of cloth or paper (coffee filters being a favorite of mine) to spread some oil on the clean grill grates.
As you can see from the photo below, I put the wings between two medium fires to insure even heating.
The wings on the upper deck were experimental (great success)! This means that, in principal, I could grill 7 pounds of wings at once on The Beast! That said, if I were doing two different types, the type not presauced would be on the top deck.

As indicated, the target temperature range was 350° F (176.7° C) to 400° F (204.4° C), with a sweet spot of 375° F (190.5° C). I achieved this, once the two chimneys of coals were in, mostly by vent manipulation. To maintain these temperatures, I periodically placed individual pieces of hardwood charcoal on the two fires using tongs.

I would flip the wings fairly frequently (first, around 10-12 minutes in and then at 8-10 minute intervals). To do so, first gently loosen the wing from the grill with the spatula. This is particularly important on the first flip.
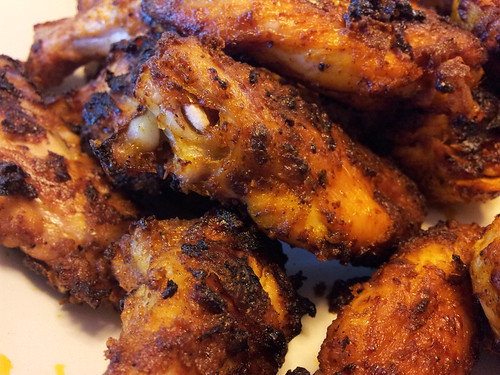
I can't remember the total cooking time, but let's call it 35-40 minutes. One more shot of food porn:

The wings actually had a slight red tint not captured under this yellow light.
We served the wings with raita. Simple recipe: mix Greek yogurt with warm water until the yogurt is quite viscous. The toss in a peeled, cored and finedly chopped cucumber. You can add in a cored, seeded tomato finely chopped and/or the same for red bell pepper, as well. Toss in some cilantro and mint to taste, and you can also squeeze in some juice from the lemon used earlier.
So, to be clear, for successful Tandoori wings (or probably successful Tandoori anything else):
1. Get rid of excess sauce;
2. Control the heat.
Posted by dag at 7:01 AM | Comments (1)
July 16, 2011
A Summer Pasta

This is a perfect pasta for the months when cherry tomatoes, zucchini and yellow squash are at their zenith (roughly mid-July through mid-September here in the Great Southland). It is light but very filling. As such it does very nicely in the heat.
Basic Ingredients:
-1 lb of dried pasta (could be penne, but look for something more interesting, like fusilli)
-Olive oil
-2 heads of garlic, peeled and chopped fine
-Some basil (at least 20 leaves) chopped into thin ribbons
-3.75 cups of halved yellow tomatoes
-2 cups of halved grape or cherry tomatoes
-2.5 cups thinly (1/8 inch or so) sliced zucchini*
-2.5 cups thinly (1/8 inch or so) sliced yellow squash*
-1 cup or so of toasted pine nuts**
-salt and pepper
-around 15 ounces of chicken stock
-parmiggiano-reggiano cheese.
* I use a mandolin for these.
**Always toast pine nuts at high heat. This requires more attention (there is a fine-and quickly crossed-line between toasted and burned) but is worth it since the nuts retain much more of their moisture, oil and integrity (and, therefore, taste and texture) that with "low and slow" toasting. I toast pine nuts in a non-stick saute pan.
(If the tomatoes are a bit large, you can quarter them but it is better to avoid doing this if possible since the halved tomatoes hold their shape and tooth feel better.)
Now, to get down to brass tacks:
Bring generously salted water to a boil. Just before you feel ready to throw in the pasta put a big saute pan over medium heat. As you throw in the pasta put some olive oil in the pan and toss in some finely chopped (or thin sliced, depending on your preference) garlic. Tip the pan to pool the olive oil in one end and then stew the garlic in the oil for 2-3 minutes.
Put the pan back down and raise the temperature to high as you throw in around 15 ounces of chicken stock and 1.75 cups of halved yellow cherry tomatoes. Thoroughly mash the tomatoes (I literally use a potato masher) into the stock as it reduces somewhat. This sauce should quickly look like this:

A few points about this step:
-If the pan becomes too illiquid, toss in some more chicken stock.
-These two components-the stock and this first infusion of yellow tomatoes-form the yellow tomato sauce that is the base of this pasta. If you want a more saucy pasta, just add a bit more of each of these.
-You could strain out the tomato skins and garlic chunks or puree them into the sauce. For instance, you could send the sauce through a food mill (if you go this route you might need to add in a few tablespoons more chicken stock). I actually prefer the texture these solids help build when they are just left alone (no straining, no pureeing, just keep cookin'). But the tradeoff is this: straining will lead to a more elegant, silky kind of expression, while not doing so preserves a kind of rustic integrity. Or some such big words.
As the tomato/chicken stock/garlic mixture is coming to a high simmer/low boil, add in some salt and freshly ground black pepper to taste (I don't use much salt because the pasta is already cooking in very salty water and parmiggiano-reggiano cheese will be added later).
After a minute or two toss in 2.5 cups each of thinly sliced zucchini and yellow squash. Add salt and pepper. Allow this to cook for 5 or so minutes, tossing often and gradually reducing heat to medium. The zucchini cooking:

On this occasion I actually went slightly overboard on the zucchini and yellow squash, so I should have either added a bit less of these or a bit more chicken stock/yellow tomato mash to achieve a little bit better sauce coverage for the zucchini and yellow squash. But this pan is a bit too crowded.
By the end of that time that zucchini and squash should have softened but still retain some faint bite and the first batch of yellow tomatoes should have formed a golden broth with the stock. When the pasta is nearly done, toss in 2 cups of halved grape or red cherry tomatoes and 2 cups of halved yellow cherry tomatoes. As the pasta finsihes, toss it in as well and allow the elements to just mingle for a minute or two. As you remove the pan from the heat toss through some toasted pine nuts and freshly chopped basil. Serve in bowls topped with some more toasted pine nuts and the undisputed king of cheeses. Make sure that each bowl has a half to three quarter inch base of the tomato broth before shovelling solids into it.
A few final notes:
-For the gluten intolerant, you could just forgo the pasta. Then, to serve, spoon some sauce into the base of a shallow bowl and pile (as artfully as you can) the mixture onto the center of the bowl, sprinkle with some remaining toasted pine nuts and shave on some Parmiggiano-Reggiano cheese.
-Never grate any cheese into this dish as it cooks: that will give it a creamy character that detracts from its freshness. The cheese should be a final note with its own integrity and not wholly integrated into the sauce.
-The pasta will look more elegant if you can center the solid components in the bowl and leave a margin of the golden broth all around (obviously I was not aiming for elegance with the shot above).
Update:
I re-made the dish the next day. Here is a marginally better plating of it:

Posted by dag at 12:50 PM | Comments (1)