November 13, 2011
Pumpkin Polenta
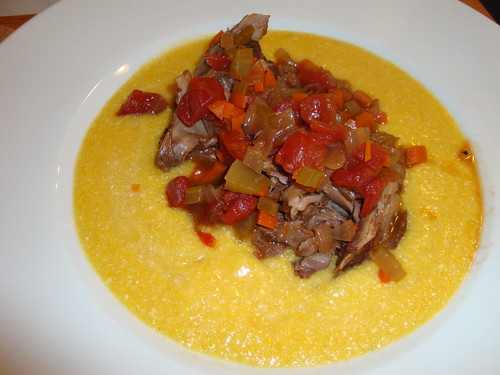
Braised lamb shank ladeled over some pumkin polenta.
One thing I love about fall (OK, one of the hundreds of things I love about fall) is the brief season of sugar pumpkins. I love fresh, farm to fork sugar pumpkins from my CSA or local farmer's markets. I really don't care for canned pumpkin, which in any case is often actually blue hubbard squash, and not real pumpkin.
So at this time of year I get to do a lot of neat things with some wonderful tasting pumpkin.* One of my favorites is a simple pumpkin polenta.
Here is how it works:
Take a sugar pumpkin, remove the stem and bore a hole from the stem area to the core, then puncture the upper half of the pumpkin with a pairing knife in 6-7 places, making sure the puncture reaches the core. It is extremely important that you bore this hole and make the cuts, and do so correctly: if you do not the pumpkin could explode on you!
Make a little aluminum foil base for the pumpkin and place in a 375° F (190.6° C) oven. Roast for about 1.5 hours, until an instant read thermometer inserted well into the flesh near the base of the pumpkin reads 180° F (82.2° C)
Remove the pumpkin and let cool to the point where you can handle it. Then slice the pumpkin in half and remove the seeds and pulp at the center.
Scoop out the flesh and run through a food mill. Add a dash of cinnamon and let fully cool and then mix in ricotta (about 1/4-1/3. depending on taste, of your volume of pumpkin).
Then, basically, make polenta for around 5-6 people and, when you are done with the polenta, mix in a dab of butter and then the pumpkin-ricotta mix. Mix through thoroughly. It makes a great base for things like rich fall braises.
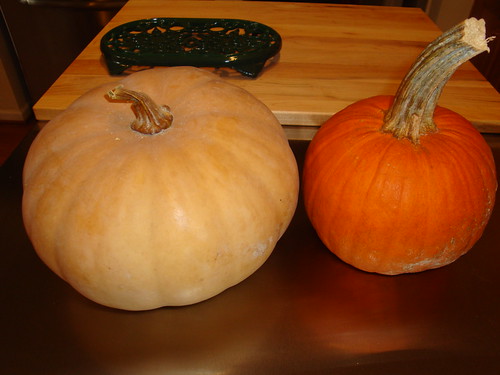
On the left is a Long Island Cheese Pumpkin, on the right is a basic sugar/pie pumpkin.
* I have been told that the Long Island Cheese Pumpkin is a very good substitute for the basic sugar/pie pumpkin. I will be experimenting with them as the winter roles on because a major advantage of the Long Island Cheese is that it is available here in the Southern Part of Heaven much deeper into the cold months than the pie pumpkin.
Posted by dag at 8:43 PM | Comments (0)
Obama's Soup
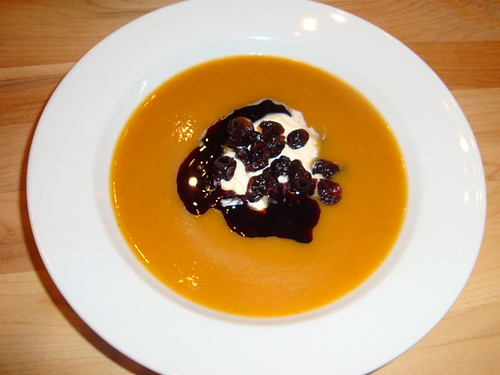
This is a recipe that I developed from the starting point of one provided in the New York Times by Sam Kass, President Obama's personal chef in the White House. I found the original to be somewhat half-hearted (i.e. mute flavors) but also maybe a touch too acidic. I re-worked it slightly to turn it into a fall classic in our household. It has a kind of creamy, squashy nuttiness braced by cider that, to me, is somehow just evocative of autumn. It is autumnal, you could say.
Anyway, the basic ingredients:
-Butternut Squash (I usually do 3-4 big ones or 4-5 medium ones);
-4-5 Apples. Kass used Granny Smiths, which I felt created too acidic a final product. I tend to use sweeter red apples, like Fuji's, Macs, Winesaps, etc.;
-Apple Cider (30-40 ounces, depending on your taste for acidity). Use real, pressed fall apple cider, not dressed up apple juice;
-14 ounces of chicken stock (I use Swanson's canned; I don't care for the taste of many of the fancier, pricier ones I've tried; I'll make my stock again someday, when I no longer have a 2 year old child);
-Salt, pepper, cinnamon;
-Nutmeg (buy 'em whole and grate them in with a Microplane-type grater);
-Dried cherries (if you have a choice, tarter cherries are better than sweet ones for this dish);
-Pumpkinseed oil (I use Styrian pumpkinseed oil from Austria; my favorite to date is from Castelmuro, but I plan to try La Tourangelle's take at some point);
-Crème fraîche (a tub that will be used for whopping dollops down on the soup just before serving).
-Any neutral oil (like grapeseed).
And now for the show:
Preheat oven to 400° F (204.4° C).
Cut 3 large (or 4 medium) butternut squash in half. Scoop out the seeds and cut each half into roughly 4 pieces each.
Toss the butternut squash chunks in a salad bowl with oil, salt and pepper.
Oil a baking tray (this is mostly about making cleanup easier for you), put down a layer of aluminum foild and arrange the squash over shallow tray, skin side down, and then cover tightly with foil.
Bake in the oven for about 45 minutes (until very soft).
Meanwhile, after about 30 minutes core and quarter your apples. Toss them in the same salad bowl with oil, salt and pepper. Prepare another shallow tray in the same fashion that you did the first (ie rub the inside of the tray with oil and then cover the inside with a layer of foil, arrange the apples skin side down and cover with foil.
When you remove the squash from the overn, replace with the apple chunk tray.
Cut open (carefully: there can be a blast of hot steam) the foil covering the squash and let cool to the point that it can be handled.
Take the squash and scoop the flesh off the skin with a spoon and drop the flesh in a food processor. Pulse for maybe 40-50 seconds, then scoop the pulp into a food mill or chinois that has been placed over soup pot or, as with me, a Le Creuset-style enameled cast iron French oven (I use the the 9.5 quart one for this recipe, though that is probably overkill). Force the processed pulp through the mill or chinois.
If at any point your pulp is not liquid enough to make this work, just add in some of the cider at the food processor stage.
If your processor or food mill/chinous is smaller, then do this in batches.
Meanwhile, the apples are roasting. How long should they roast? Well, it depends on the apple. Some kinds take almost as long as the squash.
Remove the apples after maybe 25 minutes, peel back the foil from a corner (again, BE CAREFUL: hot steam can come rushing out) and fork test an apple for doneness (ie, does the fork penetrate the apple easily?). If not, re-seal the foil and give it another 20 minutes in the oven.
Once the apples are done, remove the tray containing from the oven and CAREFULLY (again, hot steam, people!) peel back the foil and allow the apples to cool to the point where you can handle them.
And then they get the same treatment as the squash: scoop the flesh from the skin (I often just scrape it by hand), plop in a food processor, process for 30-40 seconds, send it through a food mill or chinois (do this in batches if necessary).
Add in the remainng apple cider and the chicken stock.
Put on low heat and slowly (slowly!) bring to heat.
Add in cinnamon (be a little bold but not ridiculous) and nutmeg (grate in perhaps half a nutmeg seed).
(Remember, you can always add in more cinnamon or nutmeg later; removing it later...not so much).
As this soup comes to heat it might initially have a smell or taste that seems slightly amiss. The reason for this is that chicken stock has not yet blended harmoniously with the other components. Don't worry about it: as it gradually comes together with the heat everything will work out!
(Trust me. I'm not like the others: I'm your friend.)
Once it has come to a low simmer let it continue to simmer very low for a bit.
To serve: Ladle out the soup into warm soup bowls, put a dollop (by which I mean a generous spoonful, but that is it) of crème fraîche in the middle of the soup, sprinkle 8-9 dried cherries on the crème fraîche and then drizzle pumpkinseed oil around the base of the hill of crème fraîche. It should present in a very aesthetically appealing way, but advise your guests, family, mortal enemies, (whoever and etc.) to swirl the components together with their spoons.
I have to admit that I have not put a lot of thought into what to serve with this, but maybe a hot apple cider/calvados mix might not be bad, or a sweeter wine like a sauternes. Certainly do not match this with a Ferrari engine-style red.
Tips
-If you find the soup too sweet, introduce some acidity, perhaps with a bit more cider mixed with apple cider vinegar.
-If you see a localized body of foam forming on the surface of the soup while under simmer, stir! And perhaps reduce the heat a bit! That is an early warning sign that the soup below is starting to clump up a little under the heat and may burn to the bottom.
-It is better to serve this soup in a shallow, wide soup bowl: the crème fraîche/cherry formation will not sink below the surface.
Posted by dag at 8:12 AM | Comments (0)
November 8, 2011
Duck and Squash Risotto
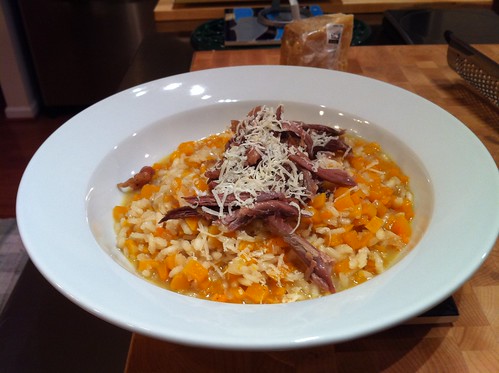
This is an adaptation of a recipe from Chef Charlie Palmer's Great American Food (a classic New American Cuisine cookbook). It basically marries the sweetness of a sweet Riesling with the sweetness of a fall squash (butternut is my favorite but he uses pumpkin) with the richness of duck confit and a creamy risotto. Its a great dish for a crisp fall weeknight evening: quick and hearty.
To serve around 2:
Take one medium butternut squash, slice down the middle, remove the seeds and inner pulp junk, peel the skin of the two halves and dice into 1/4 to 1/3 inch cubes.
Skin and finely chop three large shallots.
Take a duck confit leg quarter from the fridge and put in a shallow pan and in a 300° F (148.9° C) oven, and gradually raise to 500° F (260° C) over the next 20-30 minutes, or until the fat is sizzling. Remove and allow to cool until you can handle it.
Meanwhile heat up around 3.5 cups of chicken stock in a pan (this gives you a little safety margin).
Heat a non-stick pan to medium high and dollop in around 1/5 of a stick of butter. Once the butter has melted toss in the squash cubes, season with a bit of pepper, add maybe 1/2 tablespoon of cinnamon and 1/3 of a nutmeg nut/seed grated. Toss through and gradually ratchet up the heat to just under high, cooking the squash cubes until soft (about 8-10 minutes). Remove from the heat and allow to cook 5 minutes before adding and mixing in 1 to 1.5 cups of sweet Riesling wine.
Meanwhile fire up the risotto pan to medium low. Throw 1/4 stick of butter in the risotto pan, add the shallots and, when they begin to sizzle, add in arborio rice.
How much? Well, if I was going to be honest, in my case it works out to about 2 handfuls per person, but I think if you want to be more formal about it I would say maybe 1/3 of a cup of risotto per person.
Anyway, and this is very important, cook the rice in the butter shallot mixture for a while, stirring frequently and listening to it sizzle and crack. Once you can smell the butter just starting to burn (after about 5 minutes) add in enough heated stock to cover the rice by about 1/2 inch, and keep repeating this process until the rice is nearly done (which you can tell by biting grains in half and examining the cross sections).
When it is almost done, toss in 1/4 stick of butter and swirl through and then toss in the squash.
Remove from heat, put risotto in bowls, top with half of the shredded duck and then grate on some parmiggiano-reggiano cheese.
Voila.
The result is a little on the soupy side for risotto (largely because of the liquid in the form of riesling that comes in with the squash) but I think that is alright.
Note: If you want the squash a but more integrated, mush half of it. Tonight's messily plated version (pictured above) was maybe a bit too separated in terms of its components.
Posted by dag at 7:03 PM | Comments (0)
November 6, 2011
Duck Breast 101
The topic du jour is duck breast. Duck breast is a staple of our household from the fall to late spring. There is something about the suite of duck, turnips, roast pumpkin, butternut squash soups, apples, bacon, cinnamon, curry, ... that just signals "fall" to me.
Let me begin with the basic steps:
1. Let the duck breast sit in the fridge (outside of any packaging) for days;
2. Sous vide the duck breast at 130°F (54°C) to 134°F (56.7°C) for hours (at least three);
3. Remove the duck from the water bath and vacuum seal;
4. Score the fat;
5. Place it fat side down in a frying pan (non-stick not necessary) and sautee until brown;
6. Flip over to given the non-fat parts heat for 3-4 seconds;
7. Remove from the frying pan and let rest fat side up for 10 minutes;
8. Heat up the duck fat in the frying pan and spoon some over the fat side of the duck breast;
9. Salt and pepper the fat side of the breast;
10. Let sit 1 minute on a cutting board;
11. Slice;
12. Transfer to a cooling rack over a flat pan for 2 minutes; hold reserve duck on rack;
12, part deux. A little holy smoke, perhaps?;
13. Plate with the remaining components and reserve the rest.
OK, let's start with (the implicit) step 0: choosing a duck breast. There are basically three common types available to consumers in the US. First, the most likely duck at your grocer is Pekin, also known as Long Island. This is a very fatty duck; I prefer it for confit or roast whole duck. A second, and good, choice is the Muscovy duck, with a big breast (particularly males), less fat and a rich meat in the breast. Finally, there is the Moullard (a cross between Muscovy and the wild Mallard) duck, your classic foie gras duck. The breast of these is referred to as Magret. I usually use the Magret and, in particular, tend to favor the D'Artganan brand.
The point of step 1. is based on my own gross casual empiricism: I have noticed that letting the duck sit for a few days (at least three and up to five) in the fridge helps concentrate its "duckiness", yielding a deeper, richer and ever so slightly more gamey (which I look for) flavor in the end product. To me it almost moves the duck a bit toward the taste experience of wild mallard taken down with your family's old side-by-side. It is very important that you leave the duck outside of whatever packaging encased it originally.
The best way to do this is to have it skin side up on a cooling rack above a flat pan (see the rack and pan setup below: I find this kit generally to be so useful for handling proteins). If you leave it on a plate make sure that it does not sit in a pool of duck blood. Do not worry if it seems kind of stiff or dry after a couple of days. You could say that this is akin to a kind of dry aging.

(The duck, skin side down, after a few days of dry aging in the fridge. Note the rich, deep red of the meat. Note the grid marks on the meat: it was laid skin side up, as it should be.)
The sous vide stage is pretty explanatory. I like a fairly medium rare duck breast. Hence the temperature setting of 130° F (54.4° C) to 134°F (56.7°C) . I would not go above around 136° F (57.8° C) or below 128.5° F (53.6° C) . I find that it is better to go longer than shorter in the water bath: the resulting breast tends to be more tender.
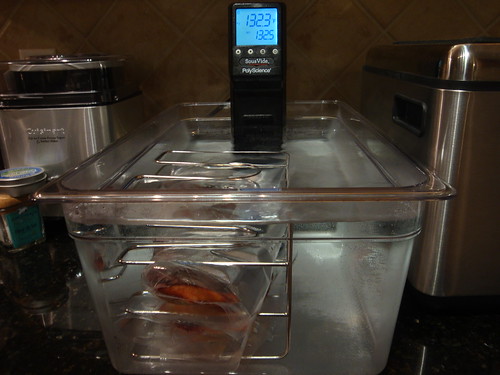
(The birds in the bath. I went with 132.5° F (55.8° C) this time. It was en sous vide for roughly 4 hours.)
I score the fat (step 4.) for several reasons. It provides the "classic" look. I find that the scored fat also browns better and provides a more texturally appropriate surface for holding on to seasoning.

(The scored breasts after coming out of the water bath, alongside the Shun Nakiri I usually apply to this task, chiefly because knives of this design help you a bit with avoiding the cardinal sin of scoring: never cut down to the meat. )
For step 5. I tend to cook the fat down a fair amount. But I don't like really fatty duck breast. I saute over medium high heat, and I tend to lubricate the pan first with a bit of a neutral oil that can handle heat, such as grapeseed oil (a few times when I did not do this there was some slight char on the duck breast). I tend to drizzle a bit of the oil into the empty pan and then smear it around with a paper towel. Initially, I always heat the pan to medium: even with the neutral oil I find that setting it in too hot a pan initially can create some burn. I then raise to medium high over the next minute or so after the breast is put in the pan.
One thing I do not do much is use the torch. I find that it adds burnt bits with duck.

(Post searing (but pre-seasoning) of the fat side, with two different takes on doneness. This is mostly about personal preference. The breast on the left is crispier, but at the cost of a bit less juice than the right hand side breast. The tradeoff can be diminished somewhat by coming to high heat quickly.)
Step 8. is basically about creating a moist, glistening surface which will hold on to the salt and pepper, and Step 10. is intended to allow the spooned duck fat to cool a little, so that the salt and pepper will "grip" the duck.
In Step 9 I call for salt and peppper, but more generally just add whatever dry material (powder, flake, grain (as in, of salt), etc.) is called for to finish the crust. So, for example, you could dust on five spice powder for a more Asian taste. The point is that you spoon heated fat on the skin, giving a glistening surface to which the dry finisher will adhere.
For Step 11. it is really important to use a very sharp knife. Otherwise you would not get clean, gorgeous slices.
Step 12. is all about making sure that the sliced duck does not wallow in its own blood (which will be leaching out). Transfer gently from the cutting board to the cooling rack, carrying the duck from underneath (do not mess up the beautiful vista of the top of the duck).
Step 12, part deux is just a little final, interesting touch: hitting the duck with a bit of smoke, to introduce another interesting level of flavor and a kind of re-assuring rusticity. However, since doneness is about perfect at this point, it must be cold smoke. To pull this off, I would recommend either whatever ghetto cold smoking contraption you have rigged up or some commercial gadget like the Polyscience Smoking Gun.

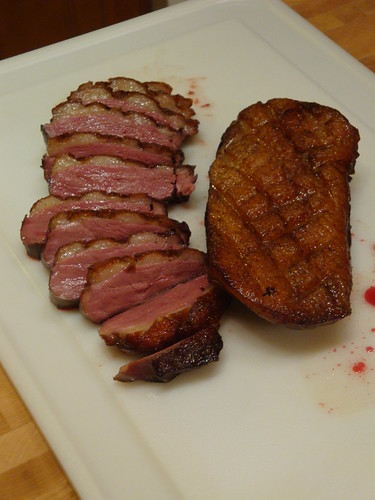
(The gorgeous final doneness. Note the perfect, consistent medium rare throughout. Notice as well the unpardonable slight tearing of the carmelization on the fat: this is what happens when you don't check the sharpness on your knife! Your knife for slicing the breast should be as sharp as hell!!!)

(Beautiful pink!)
A few final points:
1. I like to let the diner sauce their own breasts. I thus tend to have the sauce in a serving vessel on the side.
2. The sauce should be warm, not hot. For this one I threw pitted dark cherries, some sugar (for some maceration action above all), some water, some chicken stock and some thyme on the sprig into a sauce pan, brought it to heat, removed the thyme sprig, sent the result through a food mill, returned to the pan, threw in some more pitted dark cherries, reduced, reduced, reduced, threw in a bit of butter, and then removed from the heat and let cool in a serving bowl. There are literally a trillion variations on this basic sauce.
3. Do not lay the duck breast down on some sort of steaming component (like a risotto just out of the pan). If you spoon a sauce over it, make sure it is not molten hot. This sort of thing will overcook the duck!!
4. I generally like to cook the breasts unadorned, and then add finishing touches (salt and pepper; an Asian five spice thing; whatever) at the end. There are a few exceptions (e.g. duck a l'orange) that prove the rule: most of the finishing touches penetrate (and hence add) little while cooking in the water bath en sous vide. And the finishing touches frequently complicate carmelization of the skin. And anyway most of the time the whole point of duck breast for me is some kind of outer crust paired with unblemished internal duckulence (who needs penetration of flavor?).
5. God designed this kind of duck dish for Pinot Noir. Or was it the other way around?
Posted by dag at 9:29 PM | Comments (0)
September 16, 2011
The Brick Wall
Fall is here .... and (channeling Game of Thrones) winter is coming.
And tonight came a sure sign: we broke out the Brick Walls.
This cocktail is one of our fall favorites at Magnolia Grill, and it is one you can easily pour at home. (But do try it at Magnolia Grill as well, as a prelude or postscript to one of the best meals you have had in a long, long time.) A perfect marriage of bourbon, cider and autumnal spiciness, many an October evening we and our guests have enjoyed a couple of these on the porch after dinner. They are really a magical note for the season.
To begin with, make the syrup, which is easy enough. Combine:
2 cups apple cider
1/4 cup sugar
3/4 inch ginger, peeled and thinly sliced
5 allspice berries, cracked
4 whole cloves
in a sauce pot. Simmer over low heat for 10 minutes. Steep off heat for 1 1/2 hours. Strain and retain liquid (discard solids). We usually keep the liquid in a glass jar and often make several portions of syrup (it will last for a couple of weeks in the fridge).
To make the cocktail:
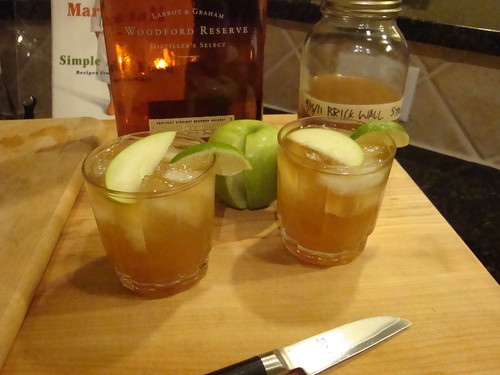
Combine 2 parts syrup to 2 parts Woodford Reserve Bourbon in a glass. Fill with ice, top with gingerale (perhaps 1-1.5 parts) and garnish with a lime wedge and a thin granny smith apple slice.
Note: The recipe, as originally explained to me by the bartender at Magnolia Grill, proposed so many ounces of bourbon, syrup, etc. I give these proportions because I don't know how big your glasses are. The syrup is enough for perhaps 8-10 brick walls in the glasses shown above. I would not make vast amounts of syrup. It often does not taste as good after a few weeks. And besides, it is easy to make.
Posted by dag at 8:30 PM | Comments (0)
July 21, 2011
Calvados and Memory

One of the things I really dislike about the South's long, hot and hazy summers (this week is, so far, conforming to the template) is that Calvados seems so out of place in the midst of it. Calvados is an apple-based brandy from Normandy (the best of it still comes from there) that on the nose and palate delivers complex layers of apple (unsurprisingly, and ranging-even in the same bottle-from fresh Granny Smith to apple pie to something more cidery), accompanied by, variously, vanilla, almond, cinnamon, butter, caramel, etc., often with underlying smoke or spiciness. It should be self-evident why anyone would love it for slow sippin' on the back porch, especially in the fall.
It also has the power to transport. When I drink it I get the most powerful memories of visiting Indian Ladder Farms (the landscape of which is pictured), a really magical place near Albany that was a favorite fall haunt as a child. We would visit several times every fall for fresh-pressed cider (they have an honest to goodness, and operational, old-fashioned cider press), fresh sugar donuts (among connoisseurs it is well known that Indian Ladder Farms makes the single best donut on Earth), pick your own apples, pumpkins, etc. etc. We would also simply wander around the farm and stare up at the turning leaves along the Indian Ladder cliffs, through which Mohawk Iroquois trade routes had operated since the Dream Time of upstate New York. The air was crisp; the world was at once very new and ancient. It felt perfectly autumnal.
On days like this I really miss Indian Ladder Farms in the fall.
On days like this I really miss upstate New York.
Posted by dag at 8:04 PM | Comments (0)